'Dev Note/Java'에 해당되는 글 8건

  1. 2011.08.10 Java Mail 발송 (GMail SMTP 이용) 2
  2. 2010.01.11 Quartz의 CronTrigger를 이용한 스케줄링
  3. 2008.12.02 Java 메모리 영역 구조
Dev Note/Java2011. 8. 10. 21:16

java mail API를 이용하여 GMail의 SMTP를 이용하여 메일을 발송하는 것에 대해 아주 간략하게 알아본다.
메일을 발송하기 위해서는 Java Mail API와 GMail 계정이 필요하다. (GMail SMTP는 SSL로 계정 인증을 해야 사용이 가능하다.)

발송되는 메일의 텍스트는 HTML이며, UTF-8이다. Text나 다른 캐릭터셋을 원한다면 조금 수정하면 된다.
기능은 첨부파일이 있는 메일과 없는 메일만 구분하여 제공한다.

import java.io.File;

import java.util.Date;

import java.util.Properties;


import javax.activation.DataHandler;

import javax.activation.FileDataSource;

import javax.mail.Authenticator;

import javax.mail.Message;

import javax.mail.Multipart;

import javax.mail.PasswordAuthentication;

import javax.mail.Session;

import javax.mail.Transport;

import javax.mail.internet.InternetAddress;

import javax.mail.internet.MimeBodyPart;

import javax.mail.internet.MimeMessage;

import javax.mail.internet.MimeMultipart;

import javax.mail.internet.MimeUtility;


/**

 * <PRE>

 * SmtpMailer class

 * SMTP 이용하여 메일을 발송한다.

 * </PRE>

 *

 * @author ukzzang

 * @version v0.8, 2011. 8. 2.

 *

 *          <PRE>

 * - History

 *            2011. 8. 2., ukzzang, 최초작성.

 * </PRE>

 */

public class GmailSmtpSender {


    // gmail smtp default info

    public static final String DEFAULT_TRANSPORT_PROTOCOLC = "smtp";

    public static String DEFAULT_SMTP_SOCKET_FACTORY_CLASS 
           
"javax.net.ssl.SSLSocketFactory"
;

    public static String DEFAULT_SMTP_HOST = "smtp.gmail.com";

    public static int DEFAULT_SMTP_PORT = 465;


    private Properties props = null;


    /**

      * constructor

      */

    public GmailSmtpSender() {

        this(DEFAULT_SMTP_HOST, DEFAULT_SMTP_PORT,

                           DEFAULT_SMTP_SOCKET_FACTORY_CLASS);

    }


    /**

      * constructor

      *

      * @param host smtp host (domain or ip)

      * @param port smtp port

      * @param socketFactoryClassName smtp socket factory class name

      */

    public GmailSmtpSender(String host, int port, String socketFactoryClassName)
    {

        props = new Properties();


        // 기본 프로퍼티 설정

        props.put("mail.smtp.starttls.enable", "true");

        props.put("mail.smtp.auth", "true");

        props.put("mail.transport.protocol", DEFAULT_TRANSPORT_PROTOCOLC);


        // 지정 가능 프로퍼티 설정

        props.put("mail.smtp.host", host);

        props.setProperty("mail.smtp.socketFactory.class",

                           socketFactoryClassName);

        props.put("mail.smtp.port", String.valueOf(port)); 

    }


    /**

      * SMTP 이용하여 메이을 발송한다. (인증을 위해 Gmail 계정정보가 필요하며, 첨부파일 처리는 없다.)

      *

      * @param authId 인증 아이디

      * @param authPasswd 인증 패스워드

      * @param from 보내는 사람 메일 주소

      * @param fromName 보내는 사람 표현 이름

      * @param to 받는 메일 주소

      * @param cc 참조 메일 주소

      * @param bcc 숨은 참조 메일 주소

      * @param subject 메일 제목

      * @param content 메일 내용

      * @throws Exception

      */

    public void sendSmtpMail(String authId, String authPasswd, String from,
           
String fromName, String[] to, String[] cc, String[] bcc,

            String subject, String content) throws Exception {

        Message msg = createMessage(authId, authPasswd, from, fromName, 
                to, cc, 
bcc, null); // create message


        // subject & content

        msg.setSubject(subject);

        msg.setSentDate(new Date());

        msg.setContent(content, "text/html;charset=utf-8");


        Transport.send(msg); // send mail

    }


    /**

      * SMTP 이용하여 메이을 발송한다. (인증을 위해 Gmail 계정정보가 필요하며, 첨부파일 처리는 없다.)

      *

      * @param authId 인증 아이디

      * @param authPasswd 인증 패스워드

      * @param from 보내는 사람 메일 주소

      * @param fromName 보내는 사람 표현 이름

      * @param to 받는 메일 주소

      * @param cc 참조 메일 주소

      * @param bcc 숨은 참조 메일 주소

      * @param subject 메일 제목

      * @param content 메일 내용

      * @param attachFiles 첨부파일

      * @throws Exception

      */

    public void sendSmtpMail(String authId, String authPasswd, String from,

            String fromName, String[] to, String[] cc, String[] bcc,

            String subject, String content, File[] attachFiles)

            throws Exception {

        Message msg = createMessage(authId, authPasswd, from, fromName, to, cc,

                bcc, attachFiles); // create message


        // subject & content

        msg.setSubject(subject);

        msg.setSentDate(new Date());


        Object contentObj = msg.getContent();

        if (contentObj != null && contentObj instanceof Multipart) {

            MimeBodyPart contentPart = new MimeBodyPart();

            contentPart.setText(content);

            contentPart.setHeader("Content-Type", "text/html;charset=utf-8");


            Multipart mPart = (Multipart) contentObj;

            mPart.addBodyPart(contentPart);

        } else {

            msg.setContent(content, "text/html;charset=utf-8");

        }


        Transport.send(msg); // send mail

    }


    // 메시지를 생성한다.

    private Message createMessage(String authId, String authPasswd,

            String from, String fromName, String[] to, String[] cc,

            String[] bcc, File[] attachFiles) throws Exception {

        GmailSmtpAuthenticator auth = new GmailSmtpAuthenticator(authId,

                authPasswd); 

        Session mailSession = Session.getDefaultInstance(props, auth);


        // create message

        Message msg = new MimeMessage(mailSession);


        if (fromName != null) {

            msg.setFrom(new InternetAddress(from, MimeUtility.encodeText(

                    fromName, "UTF-8", "B")));

        } else {

            msg.setFrom(new InternetAddress(from));

        }


        // add to

        InternetAddress[] toAddr = null;

        if (to != null) {

            toAddr = new InternetAddress[to.length];

            for (int i = 0; i < to.length; i++) {

                toAddr[i] = new InternetAddress(to[i]);

            }

        } else {

            toAddr = new InternetAddress[1];

            toAddr[0] = new InternetAddress(authId);

        }

        msg.setRecipients(Message.RecipientType.TO, toAddr);


        // add cc (참조)

        if (cc != null) {

            InternetAddress[] ccAddr = new InternetAddress[cc.length];

            for (int i = 0; i < cc.length; i++) {

                ccAddr[i] = new InternetAddress(cc[i]);

            }


            msg.setRecipients(Message.RecipientType.CC, ccAddr);

        }


        // add bcc (숨은참조)

        if (bcc != null) {

            InternetAddress[] bccAddr = new InternetAddress[bcc.length];

            for (int i = 0; i < bcc.length; i++) {

                bccAddr[i] = new InternetAddress(bcc[i]);

            }


            msg.setRecipients(Message.RecipientType.BCC, bccAddr);

        }


        if (attachFiles != null) {

            // 파일 첨부

            Multipart multipart = new MimeMultipart();


            for (File attachFile : attachFiles) {

                if (attachFile != null && attachFile.exists()) {

                    MimeBodyPart mimeBodyPart = new MimeBodyPart();


                    mimeBodyPart.setDataHandler(new DataHandler(

                            new FileDataSource(attachFile)));

                    mimeBodyPart.setFileName(attachFile.getName());


                    multipart.addBodyPart(mimeBodyPart);

                }

            }


            msg.setContent(multipart);

        }


        return msg;

    }


    private static class GmailSmtpAuthenticator extends Authenticator {


        private String id = null;

        private String passwd = null;


        public GmailSmtpAuthenticator(String id, String passwd) {

            this.id = id;

            this.passwd = passwd;

        }


        @Override

        protected PasswordAuthentication getPasswordAuthentication() {

            return new PasswordAuthentication(id, passwd);

        }
    }


}

Java Mail의 mail.jar가 패스에 잡혀 있어야 한다.
Posted by as.wind.914
Dev Note/Java2010. 1. 11. 15:21

유닉스 또는 리눅스를 사용해 본 사용자라면 cron을 잘 알고 있을 것이다.
cron에 실행할 명령문과 주기를 등록해 놓으면 해당 주기마다 등록해 놓은 명령문을 자동으로 실행해주는 데몬이다.

자바에서 비슷한 기능을 제공하는 Timer가 존재하지만 좀더 세부적인 스케줄링 기능이 필요할 때 Quartz를 사용하면 cron과 같이 쉽게 구현이 가능하다.

먼저 아래의 사이트에서 필요한 라이브러리들을 다운 받는다.
Quartz 배포 사이트 : http://www.quartz-scheduler.org/
Apache Commons Collections : http://commons.apache.org/collections/
Apache Commons Logging : http://commons.apache.org/logging/
Apache Log4j : http://logging.apache.org/log4j/1.2/index.html

예제로 할 프로그램은 두개의 Job이 있으면 각각 다른 주기로 스케줄링하여 실행하게 된다.
첫번째 Job은 일반적으로 실행되는 Job이며, 두번째 Job은 실행 된 후 70초 후 종료되는 Job이다.

Job으로 사용할 클래스는 반드시 org.quartz.Job 인터페이스를 구현해야 한다.

[ Job Sample Code ]
package ukzzang.sample.quartz;

import java.util.Date;
import org.quartz.Job;
import org.quartz.JobExecutionContext;
import org.quartz.JobExecutionException;

public class SampleJob implements Job {
    public void execute(JobExecutionContext arg0) throws JobExecutionException {
        StringBuilder trace = new StringBuilder();
            trace.append("SampleJob is execute :: ").append(new Date());
            System.out.println(trace.toString());
    }
}

package ukzzang.sample.quartz;

import java.util.Date;
import org.quartz.Job;
import org.quartz.JobExecutionContext;
import org.quartz.JobExecutionException;

public class DelaySampleJob implements Job {
    public void execute(JobExecutionContext arg0) throws JobExecutionException {
        StringBuilder trace = new StringBuilder();
        trace.append("DelaySampleJob is execute :: ").append(new Date());

        System.out.println(trace.toString());

        try {
            Thread.sleep(70000);
        } catch (Exception e) { }

        trace = new StringBuilder();
        trace.append("DelaySampleJob is execute end :: ").append(new Date());

        System.out.println(trace.toString());
    }
}

아래는 위의 두개의 job을 스케줄러에 등록해 주는 소스이다.
스케줄러를 생성하고, SampleJob을 매분 0초에 실행하며, DelaySampleJob은 매분 20초에 실행하게 된다.

[ Scheduler Sample Code ]
package ukzzang.sample.quartz;

import org.quartz.CronTrigger;
import org.quartz.JobDetail;
import org.quartz.Scheduler;
import org.quartz.SchedulerFactory;
import org.quartz.impl.StdSchedulerFactory;

public class SampleCronTrigger {
    private SchedulerFactory schedulerFactory = null;
    private Scheduler scheduler = null;

    public SampleCronTrigger() {
        try {
            schedulerFactory = new StdSchedulerFactory();
            scheduler = schedulerFactory.getScheduler();
          } catch (Exception e) {
               e.printStackTrace();
        }
    }

    public void start() {
        try {
            JobDetail job1 = new JobDetail("job1", "group1", SampleJob.class);
            CronTrigger trigger1 = new CronTrigger("trigger1", "group1", "0 * * * * ?");   
            scheduler.scheduleJob(job1, trigger1);
   
            JobDetail job2 = new JobDetail("job2", "group2", DelaySampleJob.class);
            CronTrigger trigger2 = new CronTrigger("trigger2", "group2", "20 * * * * ?");   
            scheduler.scheduleJob(job2, trigger2);
   
            scheduler.start();
        } catch (Exception e) {
            e.printStackTrace();
        }
    }

    public static void main(String[] args) {
        SampleCronTrigger trigger = new SampleCronTrigger();
        trigger.start();
    }
}

위의 예제 코드를 실행하게 되면 아래와 같은 결과가 나오게 된다.

[ Execute Result ]
SampleJob is execute :: Mon Jan 11 10:24:00 KST 2010
DelaySampleJob is execute :: Mon Jan 11 10:24:20 KST 2010
SampleJob is execute :: Mon Jan 11 10:25:00 KST 2010
DelaySampleJob is execute :: Mon Jan 11 10:25:20 KST 2010
DelaySampleJob is execute end :: Mon Jan 11 10:25:30 KST 2010
SampleJob is execute :: Mon Jan 11 10:26:00 KST 2010
DelaySampleJob is execute :: Mon Jan 11 10:26:20 KST 2010
DelaySampleJob is execute end :: Mon Jan 11 10:26:30 KST 2010

참고로 아래 표는 CronTrigger에 작업주기를 설정하는 식을 예로 보여준다.

설정식

설정 의미

"0 0 12 * * ?"

매일 12(정오)에실행

"0 15 10 ? * *"

매일 오전 1015분에 실행

"0 15 10 * * ?"

매일 오전 1015분에 실행

"0 15 10 * * ? *"

매일 오전 1015분에 실행

"0 15 10 * * ? 2005"

2005년의 매일 오전 1015분에 실행

"0 * 14 * * ?"

매일 오후 2시부터 오후 259분까지 매분마다 실행

"0 0/5 14 * * ?"

매일 오후 2시부터 오후 255분까지 매5분마다 실행

"0 0/5 14,18 * * ?"

매일 오후 2시부터 오후 255분까지 매5분마다 실행 그리고

매일 오후 6시부터 오후 655분까지 매5분마다 실행

"0 0-5 14 * * ?"

매일 오후 2시부터 오후 205분까지 매분마다 실행

"0 10,44 14 ? 3 WED"

3월의 매주 수요일 오후 210분과 오후 244분에 실행

"0 15 10 ? * MON-FRI"

매주 월, , , , 금요일 오전 1015분에 실행

"0 15 10 15 * ?"

매월 15일 오전 1015분에 실행

"0 15 10 L * ?"

매월 마지막날 오전 1015분에 실행

"0 15 10 ? * 6L"

매월 마지막 금요일 오전 1015분에 실행

"0 15 10 ? * 6L 2002-2005"

2002년부터 2005년까지의 매월 마지막 금요일 오전 1015분에 실행

"0 15 10 ? * 6#3"

매월 세번째 금요일 오전 1015분에 실행


Posted by as.wind.914
Dev Note/Java2008. 12. 2. 20:43

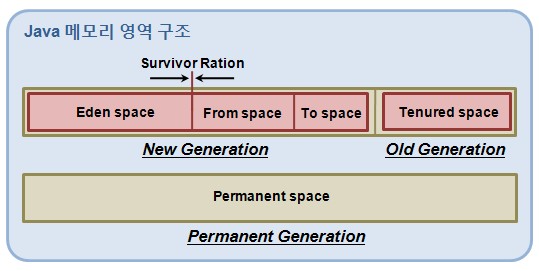
Java 메모리 영역 구조
- JVM은 힙을 아래와 같이 3개의 영역으로 나누고 있다.
   1) Permanent Space : JVM 클래스와 메소드 개체를 위해 쓰인다.
   2) Old Object Space : New 영역에서 count를 세어서 어느정도 증가된(만들어진지 좀 된) 개체를 위해 쓰인다.
   3) New(Young) Object Space : 새로 생성된 개체들을 위해 쓰인다.


New Object Space는 다시 3개의 부분으로 나누어 지는데, 모든 새로 생성된 개체들이 가는 Eden(에덴동산)과 그 개체들이 Old Generation으로 가지 전 생존해 있는 Survivor Space(From, To) 1과 2가 있다.

Java 메모리에 의한 Out of Memory 해결방법
JDK1.4에서부터 -XX:PrintGCDetails -XX:PrintGCTimeStamps -XX:PrintHeapAtGC 옵션을 사용하여 GC한 상태의 Heap 메모리 정보를 출력한다.
이 정보를 통해 New, Old, Perm의 영역 중에서 실제 어느 영역부분이 부족하여 Error가 발생하는지 찾은 후 부족한 영역의 Size를 조정해 주는방법으로 해결할 수 있다.
그러나, 부족한 영역에 계속해서 메모리 할당을 해주어도 사용률 100%가 나온다면 프로그램 누수일 수 있으니 프로그램을 점검해봐야 한다.
Heap 메모리 영역이 어느정도 차게되면 JVM은 계속해서 GC(Garbage Collection)를 시도하게 되는데, 이는 GC의 수행시간을 짧게하여 시스템 속도가 저하되는 상황이 나타날 수 있으며, 결국엔 Out of Memory가 발생하게 된다.
 명령행 스위치  설명
 -Xms=[n]   최소 Heap Size
 -Xmx=[n]  최대 Heap Size
 -XX:PermSize=[n]  최소 Perm Size
 -XX:MaxPermSize=[n]   최대 Perm Size
 -XX:NewSize=[n]   최소 New Size
 -XX:MaxNewSize=[n]   최대 New Size
 -XX:SurvivorRatio=[n]   New/survivor 영역 비율
 -XX:newratio=[n]  Old/New 영역 비율. HotSpot 클라이언트 VM은 8, HotSpot 서버 VM은 2
 -XX:TargetSurvivorRatio=[n]   GC동안 비율 생존자 수용 가능량 퍼센티지 (capacity percentage) 초기값은 50%

JVM 스위치 설정 예제
정적인 페이지들을 주로 서비스하는 경우 : 페이지 로딩에 필요한 Perm Size 위주로 메모리 튜닝
 메모리 영역 Size   설정
New Generation
Eden
174m
-Xms418m -Xmx418m
-XX:PermSize=1024m
-XX:MaxPermSize=1024m
-XX:NewSize=290m
-XX:MaxNewSize=290m
-XX:SurvivorRatio=3
From
58m
To
58m
Old Generation
128m
Permanent Generaion
1024m
Total Heap Size 
1442m
동적인 페이지들을 주로 서비스하는 경우 : New Size 위주로 메모리 튜닝
 메모리 영역 Size   설정
New Generation
Eden
534m
-Xms1024m -Xmx1024m
-XX:PermSize=128m
-XX:MaxPermSize=128m
-XX:NewSize=800m
-XX:MaxNewSize=800m
-XX:SurvivorRatio=4
From
133m
To
133m
Old Generation
224m
Permanent Generaion
128m
Total Heap Size 
1052m
Posted by as.wind.914